I’ve been hooked on the idea of screencasting ever since Jon Udell started pushing it a couple of years ago. He pointed out some very effective screencasts that others had made and posted several excellent screencasts himself, interspersed with articles on best practices, tools, and tips. As Udell pointed out in “Movies of Software,” Apple has done a less-than-stellar job at making screencasting on the Mac as super-simple as other creative and educational tasks are. He was also dismayed–well, at least, I was dismayed–to report that he was doing his screencasting on a Windows machine mainly because Microsoft had provided superior, free tools for doing so.
 *Groan* Let’s see… that was a year and a half ago! I thought surely someone from Apple would have read his blog post and rushed an update to QuickTime Pro to make amends. Not that it’s completely equivalent, because QuickTime Pro isn’t free, but at least Mac OS X users wouldn’t have to go hunting and pecking for a tool to do a basic job like screen-capturing. The problem is, you see, that the world has moved on from Grab, and when I think “screen-capture” today, I don’t just think still pictures. Heck, no. I want to capture motion… I want to capture sound. I want to capture software.
The sound part is easy, thanks to the truly superior tools Apple provides in iLife… in this case, GarageBand. But the video… Like I said, *Groan*! On a Mac, you can capture yourself making funny faces in both stills and videos… You can create little video miracles of your family at play… You can turn yourself into a budding American Idol with GarageBand and iMovie. But you can’t do a simple thing like capturing the beautiful animations and user-interface delights that Mac users enjoy while working with their software. In other words, you can’t capture videos of Mac OS X in action.
So, one of the categories of software I’ve been keeping an eye on–and cataloguing possible purchases in–has been video screen capture products. I don’t think I’d ever have the time–or talent–to prepare true screencasts in the Jon Udell mold, but I have found myself wanting to capture small videos of Mac OS X software in action on many occasions. In fact, little videos have been creeping into my software reviews and other blog posts for the last 6 months or so.
What I’ve lacked, though, is a standard process for doing these. You can’t really do a thing optimally until you settle on how it should be done. Imagine heading out for your daily commute never knowing the best route, never knowing how long the commute will take, and with no clear idea how much money you should budget for this activity. What? This is your standard state of affairs, you say?
Perhaps that was a bad example. ![]() But actually, it’s pretty close. Because as a result of those kinds of unknowns, you can’t get to work on time, you dread the daily battle… the unplanned shortcuts… the unplanned long cuts. Your commute simply takes too much time, and it isn’t any fun.
But actually, it’s pretty close. Because as a result of those kinds of unknowns, you can’t get to work on time, you dread the daily battle… the unplanned shortcuts… the unplanned long cuts. Your commute simply takes too much time, and it isn’t any fun.
Doing screencasts for me has been kind of like that. I would prepare myself to do one, head off to capture my screen and its cool activity, and find what should be a 15 or 20 minute exercise turning into 45 minutes to an hour. I don’t know about you, but I simply don’t have that kind of time to throw around these days.
Hence, I took a great deal of time to do as much testing as I needed in order to settle on a video screen capture product and work out a standard operating procedure for turning a captured screen video into a little screencast for a Musings from Mars article. Since I’m not a magazine with a full testing staff, you are more than welcome to take my product ratings with a heaping helping of salt. That’ll be especially true the farther away you get from July 2006, since who knows the trajectories these particular products will take in the coming months and years. I’m sharing this review for two reasons:
- My memory for certain kinds of details is horrible, and this way I’ll be able to look back and remember what problems I had, or delights I discovered, with each of these products. In other words: What did I test back in 2006, and why did I pick “X”. One of the truisms about software is that versions more than 5 years old are worthless. It’s because the technology advances so fast that any good software is bound to get much better, and any bad software is not going to be around. That leaves middlin’ software, such as that from a particular powerhouse in Redmond, Washington, which often muddles through from one upgrade to the next with enough musclepower and usability to stay in business, but not enough brainpower and beauty to attract attention from … but I digress.

- The second reason is that I thought, Hey! Maybe one or two people out there are in the same boat I am and will find this review useful. I’m happy to share my thoughts if it’ll help reduce the shopping time for other software hunters.
After gathering up all the known–and in several cases, unknown–software products that capture videos of software in action, I ended up trying out 7 different products:
Without further ado, and with a minimum of space and fuss, here’s the result of my quest, beginning with a few summary bullet points:
- I ended up buying a license for iShowU, even though I already have one for SnapzPro. iShowU isn’t perfect, but its developer is actively enhancing the product, and it left a trail of inventiveness and fun as it launched its way across my desktop. It’s fast, intuitive, and has excellent built-in support for audio capture. Sure, I have a gripe or two, but in the end iShowU was the clear standout for my needs.
- ScreenMimic and Screenography can record in both Flash format and QuickTime formats. I liked them both, but
- ScreenMimic had some usability problems, and not enough flexibility for me, and
- Screenography has some really nice features and is the spittin’ image of SnapzPro but better for video (including Flash), but it suffers from some fool factors that made me sick of it after a few days of testing.
- ScreenAction Studio and ScreenTool aren’t really Mac OS X products… they’re half-backed software projects that nevertheless someone is charging good money for.
- DisplayEater is potentially a good product, but it was totally unreliable in operation and took too much CPU power and time to be a standard Martian tool.
- SnapzPro is overrated, outdated, boring, and often downright irritating as a screen capture tool for static graphics, and it has only basic video screen capture chops. Which is why I went shopping in the first place.

| Name | Version | Price | Formats | Fun | Cool | Looks | Idiots | Power | Yes? | Notes | |
| DisplayEater | 1.8 | $17.00 | QuickTime | No | Notes | ||||||
| iShowU | 1.13 | $20.00 | QuickTime | Yes | Notes | ||||||
| ScreenAction Studio |
1.0.1 | $30.00 | QuickTime | No | Notes | ||||||
| ScreenMimic | 1.5.1 | $25.00 | QuickTime Flash |
No | Notes | ||||||
| Screenography | 1.0.1 | 39.95 | QuickTime Flash |
No | Notes | ||||||
| ScreenTool | 2.0.3 | $11.95 | QuickTime | No | Notes | ||||||
| SnapzPro | 2.0.2 | $69.00 | QuickTime | Yes | Notes |
Even with a copy of the $500 Flash MX software, I couldn’t figure out how to compress a Flash file to a size similar to a QuickTime file. In the end, Flash seemed like more trouble than it is worth for this exercise. That may change in the future, of course, but that’s my story at the moment.
I’ll still need QuickTime Pro in order to compress the videos to an optimum size for web publishing, since none of these tools performed better at this task. The best among them simply embed the QuickTime export functions into their products
As part of my Flash experiments, I tested Video2SWF, which is another product from the company that makes Screenography. Video2SWF has some very interesting and potentially useful features for both Flash and QuickTime publishing. But though it does a passable job at compressing QuickTime videos for the web–in either Flash or QuickTime formats–it can’t do the same with Flash files.
Besides Video2SWF and QuickTime Pro, I also tested a few other video conversion tools as part of this study: VisualHub, iSquint, swfShrink, and Flash Optimizer. Of these, VisualHub is worth buying, but not for screencasting tasks. iSquint is VisualHub’s free, one-trick-pony sibling. swfShrink is freeware that may be of interest if you have the patience, and Flash Optimizer (in both its Heavy and Lite forms) is a joke.
In the course of testing, I managed to create a slew of little videos, and I thought it might be a good idea to include a few of them here. As it turns out, though, I’m only going to include one, and it’s the same one I used in my previous Mars article on Dashboard and Yahoo widgets. In this case, it’s not a video of a Dashboard or Yahoo widget–natch!–but rather it’s an Opera widget. That’s because it was the coolest one for video purposes and also because it happened to be the one I practiced my planned standard procedure on the most.
First, the video… then, the procedure.
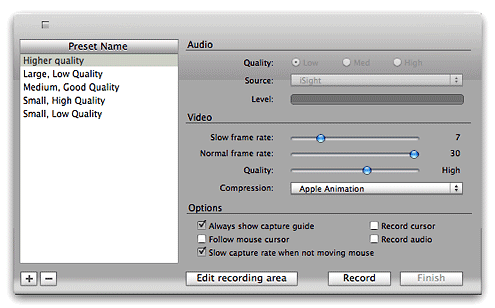
This little widget was made with iShowU, which was first captured and saved at full size in .MOV (QuickTime) format. One of the coolest things about iShowU is that–unlike any of the others–you get an instant QuickTime movie the second your capture is finished. After fooling around with many permutations of quality and compression settings, I settled on the following as a preset for iShowU:
- 30 frames/second, normal rate
- 7 frames/second, “slow” rate
- “High” quality, with the slider just above average
- “Apple Animation” compression, which is a fairly new option that the folks who make iShowU recommend for the kind of software videos I’m doing. I also got excellent results using .h264 and MPEG-4 compression with iShowU.

iShowU Main Screen
This is the main interface to iShowU, showing your presets and your settings and options for video and audio recording.
Once captured, iShowU drops me off in QuickTime Pro with a 25-second video that’s about 25mb big. I found that reducing the dimensions and further compressing the file worked just as well, if not better, in QuickTime Pro than in any of the other tools. As I mentioned previously, in fact, the other good ones simply use a QuickTime plugin for this. So ending up in QuickTime Pro with the video open just saves me a few seconds.
In QuickTime Pro, I shave a few seconds here and a few seconds there off the video, to eliminate any “dead air” or “shaky pointer” moments. The goal is simply to eliminate any frames that don’t contribute to the demo, so the video file can be as small as possible while still of reasonable picture quality. Shaving in QuickTime Pro could hardly be simpler, so this takes just a minute or two.

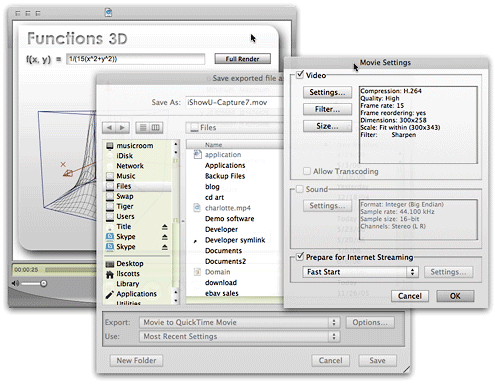
QuickTime Export Options
This screenshot shows the QuickTime Export options window that shows up when you select File/Export As..., and then click on the Options button. The displayed window shows a summary of the options selected.
I then export the file from QuickTime to a QuickTime movie file with the following settings:
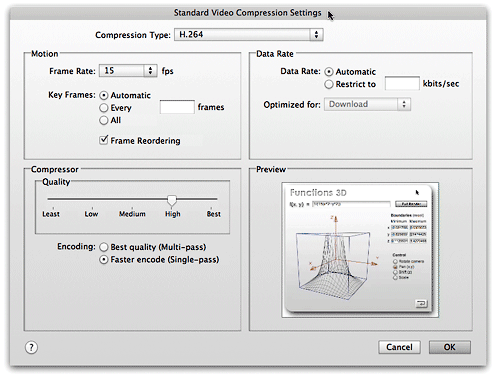
- H.264 compression at “High” quality
- 15 frames/sec frame rate, with frame reordering on
- Scale to a custom width, in this case, 300 pixels, with QuickTime set to preserve the aspect ratio and fit within the specified size
- Filtered the video with a minimum Sharpen setting.

Quicktime2
These are the QuickTime video compression settings I decided on for my screencasts.
With a 25-second file, this export process is over in only 5 seconds or so… remarkably fast, compared with the slow save/export times of the other tools in this review. The 25mb file is now shrunk down to 250kb, and from 500 pixels wide to 300 pixels. I found the quality at these settings to be quite acceptable, given the huge video compression that’s occurred. How huge? It’s only a 99% reduction, but it’ll do. ![]()
With my 1% of video in hand, I then open it in my blogging tool of choice, Ecto, and let it write the code for displaying QuickTime in my article. This isn’t optimum, because of some change or other in Internet Explorer which… blah, blah, blah. I suppose I really should care, so I’ll follow Apple’s advice and start using the technique they now recommend for embedding QuickTime in HTML.
Now all I need to do is find the time to write more articles, so I can start making little movies! Gee, I wonder if there will ever be a Webby award for screencasting? *sigh*
Hey! A Martian can dream, can’t he?


